

Setting Up Proxy Chain with TOR
Learn to Set up Proxy Chain with TOR for ultimate anonymity.

Cyber Security Student | Msc in Progress | Learning and sharing
Note: I'm expecting you to have a Linux OS for this setup. I'm using Kali Linux.
Brief on Proxy, Proxy Chain and TOR;
Proxy:
Simply put, it's the node that presents your request but using it's own details like IP address. This makes the source of request tracking just a bit lengthy. But as we're just using a single proxy, going back one step can make the request source known.
Proxy-Chain:
Let's make it difficult and more lengthy then, let's chain multiple proxies together, each one forwarding our request to the next one until the last proxy server is reached when then will forward the request to the destination server.
This just made the request source origin tractability a whole lot more difficult.
- Each proxy in the chain only knows about the previous and next proxies, not the original source of the traffic.
TOR ( The Onion Router ):
TOR is a network of volunteered nodes, traffic going through this network is encrypted. So if we put this in with Proxy-chain what will happen? It will make it even more difficult trace request source ( lets say us ) as our traffic is not only hoping through multiple proxies but also adding TOR in this making the traffic encrypted.
Dope shit right?
- By using Tor as one of the proxies, your internet traffic gets encrypted and routed through the Tor network, making it difficult for anyone to trace the origin of the communication.
Setting Up Proxy Chain;
In case you are using another Linux variant then you can just install it using your respective pkg manager.
In Debian based system, like Ubuntu, Kali Linux, Parrot OS, etc you can simply run sudo apt install proxychains. It should install proxychains which you will be able to access through /etc directory as discussed later.
I’m assuming you are using Kali Linux here.
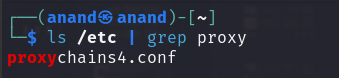
If your Proxy Chain file is not there in /etc directory, then you can use the locate command to find it:
locate proxychain4.conf

To edit your proxy chain configuration file:
sudo nano /etc/proxychains4.conf
Now that you have the proxy chain configuration file opened in the editor, you'll notice that there are 4 different modes ( each mode or type with its different way of connecting ) that we can configure our proxy chain to use:
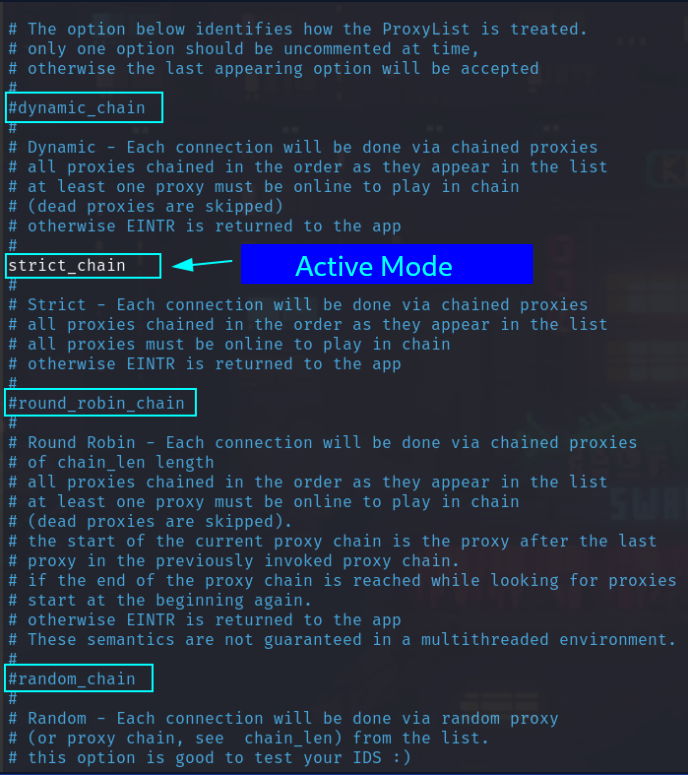
To use other proxy-chain modes ( type ), simply comment the active one and un-commnet the one that you want to use ( add or remove the # sign at the beginning of the line ).
I changed mine to
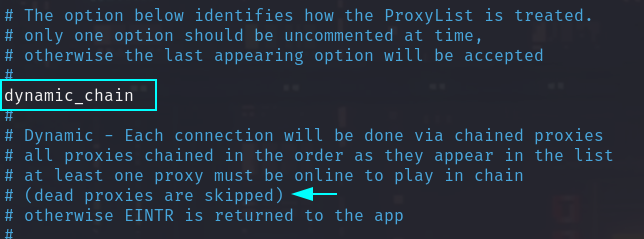
dynamic_chainas it doesn't mandate that all proxies must be online unlikestrict_chain.This is important because if one of the proxies is down in the strict_chain then you won't be able to send traffic using this proxy-chain.
So you have to change it to either dynamic or round-robin as both of these skip the proxy that isn't online in the chain.
- An explanation for each mode is there in the file itself, so read it through if you want to know how these modes are different from each other.
Now as we'll be using the proxy chain with TOR, it really doesn't matter which type of proxy chain we choose.
Also, make sure that the
proxy_dnsis un-commented in the configuration file.This
proxy_dnsoption when set toon, it means that DNS requests made by applications using ProxyChains will also be routed through the proxy servers in your chain.This can help enhance our anonymity and privacy because it ensures that DNS queries don't bypass the proxy and reveal our real IP address to the DNS server.
There are other options for proxy_dns like proxy_dns_old and proxy_dns_daemon, you can explore them on your own if it interests you, as I'm trying to keep this article short and straight to the point.
Now if you scroll down to the conf file, you'll see [ProxyList], which is where we add our proxies.
Also, you'll notice here that it is already set to use tor ( by default )
And you'll see socks4 your proxy server that running on localhost at 9050:
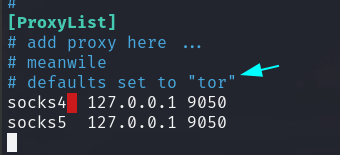
- It doesn't really matter much so you can skip adding this entry, socks5 it's optional .Add another entry with the same IP and port with with socks5 protocol.
Optional ( but Important ):
Note: You can provide entry for free public proxy servers as well here instead of using your own system ( 127.0.0.1 means localhost, making your own system as part of the chain )
you can get the list of free public proxy server list on Github or a trusted site.
Here's two that I found: link to external site or Github link
Anyways before proceeding make sure you check each server from the list for the server that you want to use has a decent speed ( less ping ), preferably high anonymity and also availability ( Uptime ), you're not choosing to use dynamic-chain or similar chain that skips dead or non-responsive proxies as it might make your request response retrieval way too time consuming, might not even . Example:
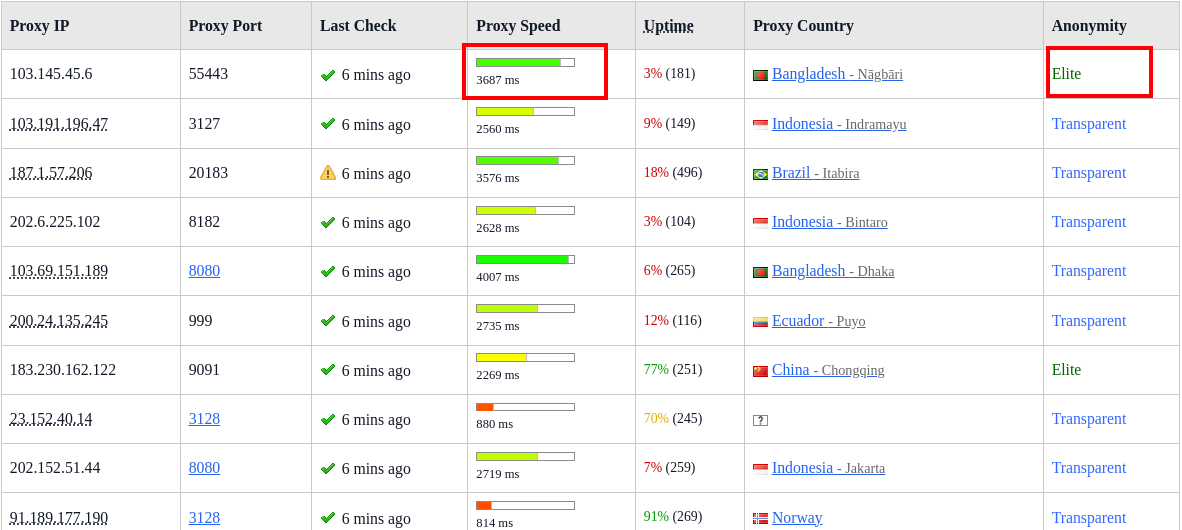
- If you're using a proxy from github proxy list then you can use this tool to check such details.
Anyways, now make an entry of the protocol that it's using, it's IP and port. Make sure you note these three things while filtering the servers that you want to use in the proxy chain.
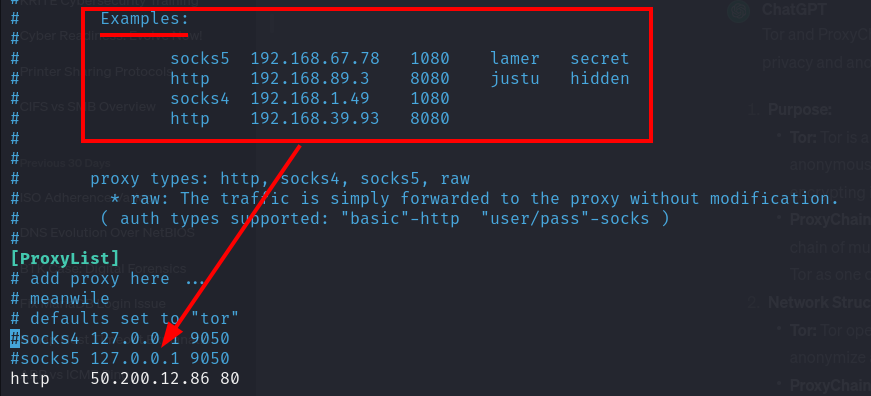
Examples are already there, you have to make the entry in the same way you made for localhost ( 127.0.0.1 ).
Some proxy server even have username and password. That's what they are in the examples "lamer" is username and "secret" is password for 192.168.67.78 proxy server example.
If you're wondering about what the heck is socks, well simply put, Socks is a protocol used by proxy servers. This protocol facilitates the connection and routing of traffic between clients and servers through a proxy server. You can use HTTP or HTTPS as the protocol instead of socks4 or 5 as well, it's up to you.
This protocol operates at the Transport Layer in the OSI Model ( the layer where TCP or UDP is decided upon and used based on the requirement of the connection ).
socks4 primarily supports TCP only.
whereas socks5 adds the support for UDP.
That's why I told you to add an entry for socks5 as it's going to make your connection UDP-compatible.
Anyways, save the file by using ctrl+x --> press y --> press Enter
Setting up TOR;
Now we need to install TOR if we don't already have it in our system.
- Open a terminal and install TOR:
sudo apt install tor
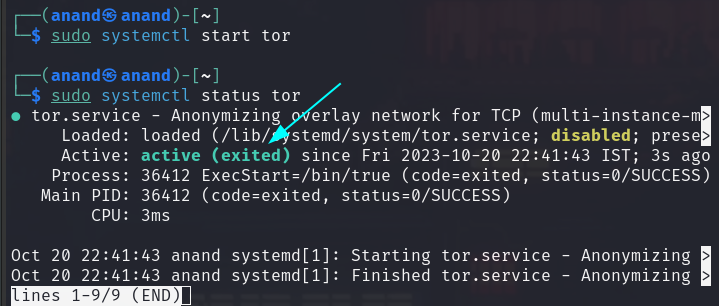
Now we have tor installed but its service ( daemon ) is not running yet:

sudo systemctl status tor
So let's start the daemon ( background process ) as well:
sudo systemctl start tor
- Now check if the tor is active or not ( use the systemctl status tor command ).
Using and Testing the Connection;
Now we're all set but we're not yet using proxy-chain.
To do that we'll need to type proxychains followed by the command or package that we want to use through this traffic:
Now Let's test this using dnsleaktest.com:
proxychains firefox #or your preferred browser to open it using proxychian
Now go to dnsleaktest.com.
- you'll see that it shows us a different location and an IP that isn't yours ( country )
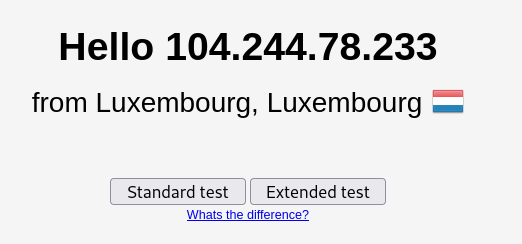
Now you can click on Standard test ( or Extented test ) for more details :

So yeah that's it. We have successfully been able to set-up proxy chain with TOR.
Hope you enjoyed this because I definitely did enjoy writing this one.
Nothing is 100% bulletproof:
While this method improves anonymity significantly, it's important to note that complete anonymity is challenging to achieve, and using such tools and methods doesn't guarantee 100% privacy.
Disclaimer:
I don't promote you into using this for an illegal purpose. Use this for Ethical Purpose only.
See you soon, PEACE!!